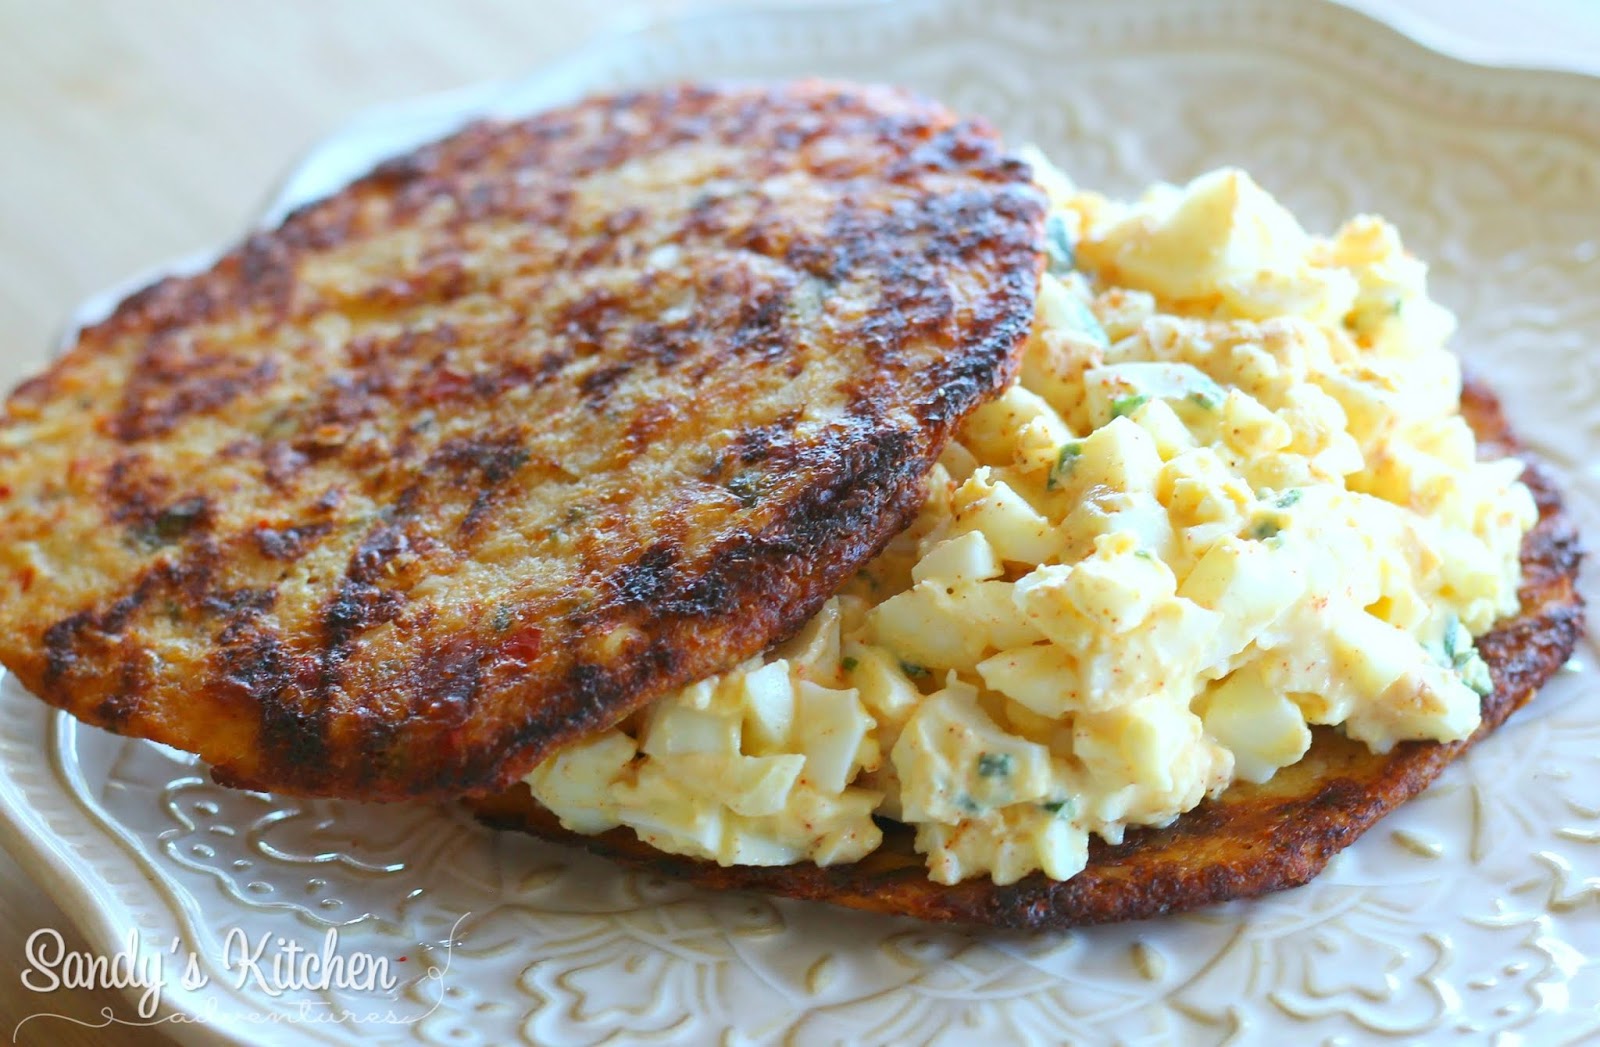
Here is a classic egg salad recipe that comes together quick and easy. It uses just a few ingredients proving simple is better.


There are several variations you can make to this egg salad. Try using fresh dill or parsley instead of chives. Or add chopped celery instead of dill pickles for that added crunch you crave in an egg salad. Chopped sweet red pepper or green onions would taste great as well!


I served this egg salad on two Outer Aisle Gourmet sandwich thins because I was craving a sandwich! They make excellent sandwiches without all the carbs of traditional bread. Two of these flatbreads count as 1/3 Lean and 2/3 of a Green! I find them at my local grocery store but check out their website for a store near you. 


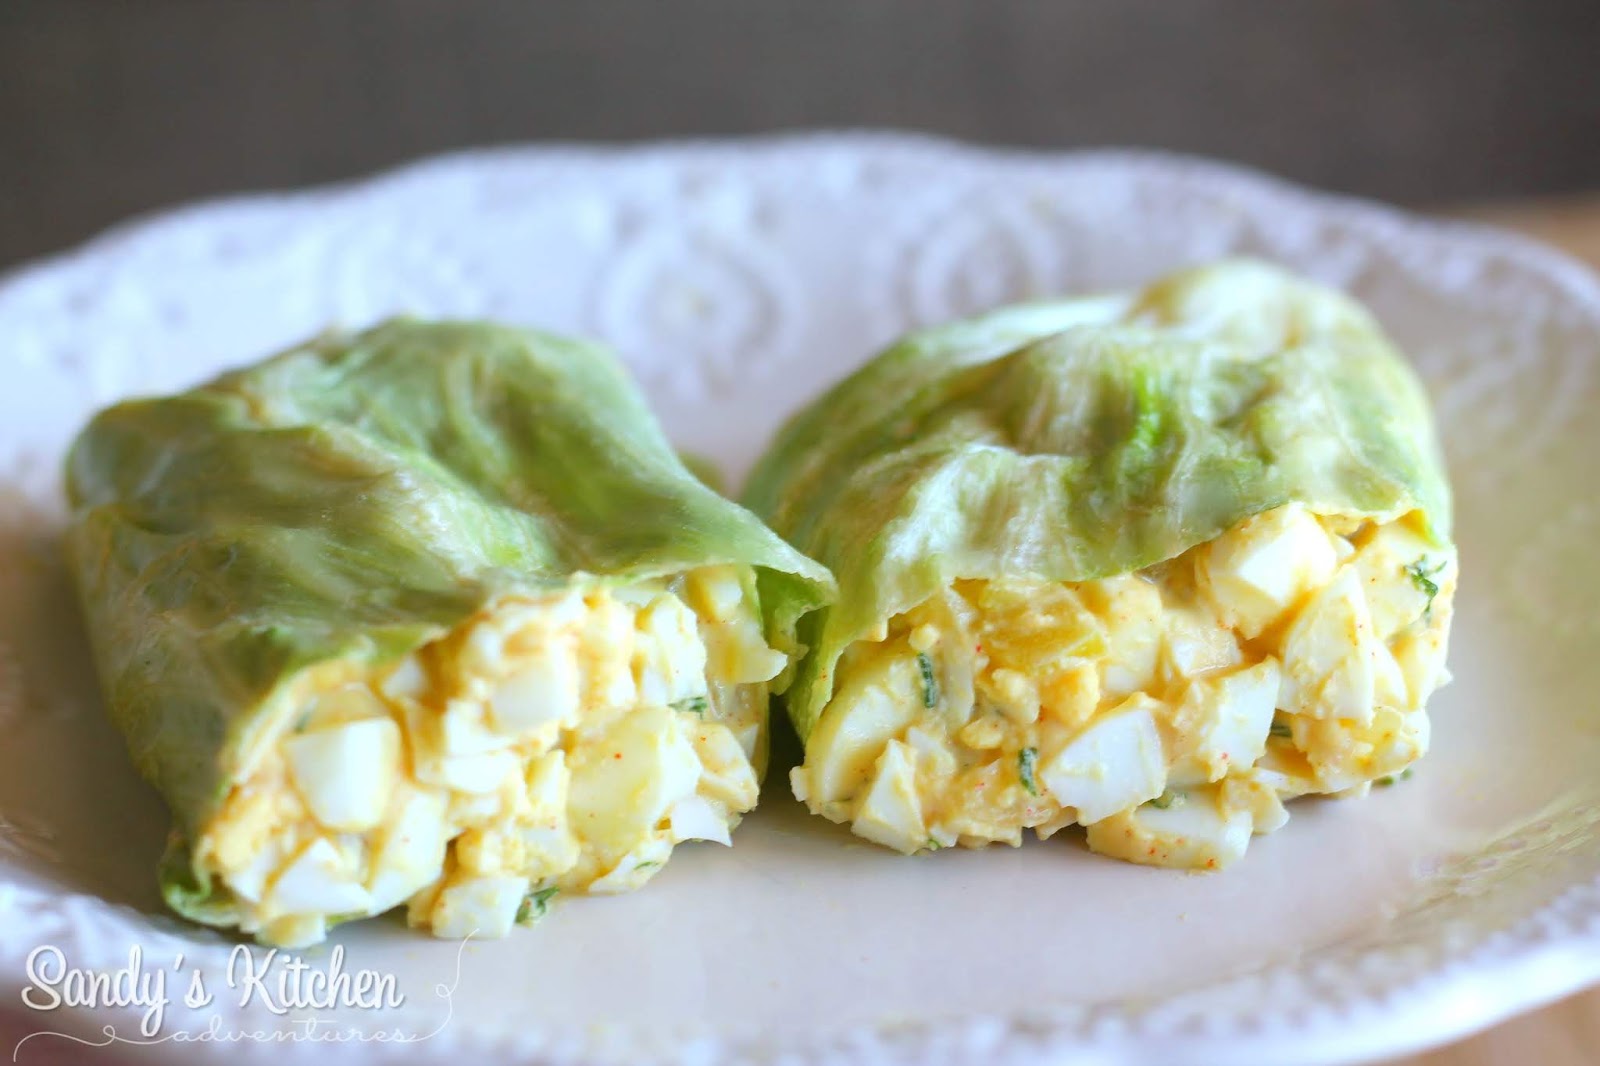
They also taste delicious wrapped in lettuce. I used iceberg lettuce, but Boston, green leaf, romaine, or butter lettuce are also great choices. Which ever way you decide to eat them, enjoy this simple easy recipe!


Quick and Easy Egg Salad

Ingredients:
6 Hard boiled Eggs (2 Leans)
2 tsp dijon mustard (2 Condiments)
4 tbsp low fat plain Greek yogurt (2 Condiments)
2 tbsp fresh chives, finely chopped (1/2 Condiment)
1/4 tsp salt (1 Condiment)
1/4 tsp paprika (1/2 Condiment)
2 dill pickle spear, finely chopped* (1 Optional Snack)

Directions:
Peel and chop the eggs and put in a medium sized bowl.
Add dijon mustard, Greek yogurt, chives, salt, paprika and pickles. 
Stir gently until combined.
Refrigerate leftovers in an airtight container up to 3 days.

Entire recipe makes 2 Servings
Each serving provides:
1 Lean, 3 Condiments, and 1/2 Optional Snack
(Add 3 Greens to complete your Lean and Green meal)

* If you prefer, you can use 1/2 cup of finely chopped celery , sweet red bell pepper, or green onions (1 Green) instead of dill pickles.

To use this egg salad on two Outer Aisle Gourmet sandwich thins,, divide the  entire recipe into 3 Servings instead of 2 Servings. This would give you 3 Servings with 2/3 Lean, 2 Condiments and 1/3 Optional Snack per Serving. Two sandwich thins will make up the other 1/3 Lean and 2/3 of a Greens. Add 2 and 2/3 more Greens to make a full Lean and Green meal.


 Pumpkin Waffles


Ingredients:

1 Optavia Chocolate Chip or Golden Pancake (1 Fueling)

1/4 tsp pumpkin pie spice (1/2 Condiment)

1 tbsp 100% canned pumpkin (1 Condiment)

1/4 cup water

2 tbsp Walden Farms pancake syrup (1/2 Condiment)


Directions:

Spray mini dash waffle maker with cooking spray and preheat.

Combine all ingredients in a small bowl, except pancake syrup. 

Add half of the batter to waffle maker.

Cook until the indicator light turns off or until done.

Then cook the rest of the batter.

Top with 2 tbsp of Walden Farms pancake syrup.


Makes 1 Serving

Each serving provides:

1 Fueling and 2 Condiments


Click Here to Print


Chocolate Chocolate Chip Cookies! Yes please! I love how these cookies are perfect for those "on the go" days and don't use any additional Condiments. I purposely didn't add any extra ingredients such as egg whites, baking powder or sweetener so that I could keep this fueling hack simple without additional carbs. The drizzle of powdered peanut butter is totally optional, but makes these cookies even yummier! Enjoy!


Chocolate Chocolate Chip Cookies

Ingredients:
1 Brownie Soft Bake (1 Fueling)
1 Chocolate Chip Soft Bake (1 Fueling)
4 tbsp water
Optional: 2 tbsp Powdered Peanut Butter (1 Optional Snack)
Additional water for Powdered Peanut Butter

Directions:
Preheat oven to 375 degrees.
Line a baking sheet with parchment paper.
Combine ingredients in a small bowl.
Place batter on parchment paper and form two cookies, 
using wet hands to flatten the cookies since the batter will be sticky.
Bake for about 14 to 15 min or until done.
Combine powdered peanut butter with 1 to 1 1/2 tbsp of water. Drizzle powdered peanut butter mixture over cooled cookies.

Makes 2 Servings
Per Serving:
1 Fueling and 1/2 Optional Snack


I am in love with my air fryer! I literally use it all the time so it has a permanent spot on my kitchen counter. I would definitely recommend getting one if you don't have one already! Best investment ever! Lately, I have been making these air fryer chicken fajitas as a quick and easy lean and green meal and they are delicious!


Start off by seasoning the chicken breast strips and peppers with salt, chili powder, cumin, garlic powder and lime juice or you could use fajita seasoning. Then throw everything in the air fryer. Air fry at 400 degrees for 14 to 15 min or until done, stirring halfway through. That is it! Dinner is done in less than 20 min!


Divide the cooked chicken and peppers into two equal portions and serve with your favorite healthy fat. I had this as a yummy fajita salad with light ranch salad dressing, while my husband had his as lettuce wraps with guacamole. Delish!


Air Fryer Chicken Fajitas

Ingredients:
1 lb chicken breasts, cut into thin strips (2 Leaner)
1/2 tsp salt (2 Condiments)
1/2 tsp chili powder (1 Condiment)
1 tsp cumin (1 Condiment)
1/4 tsp garlic powder (1/2 Condiment)
1 tbsp fresh lime juice (1 1/2 Condiments)
3 sweet bell peppers cut into strips ~ 408 g cooked weight (6 Greens)

Directions:
Combine chicken, seasonings, and lime juice in a medium sized bowl.
Add peppers with the chicken, stirring until combined.
Spray air fryer with non-stick cooking spray.
Place chicken and peppers in the air fryer.
Air fry at 400 degrees for 14 to 15 min, stirring halfway through.
Divide into two equal portions.

Makes 2 Servings
Each Serving provides:
1 Leaner, 3 Greens, and 3 Condiments

1 Serving is 6 ounces of cooked chicken with 204 g cooked peppers. Serve with 1 additional Healthy Fat such as 2 tbsp of an approved salad dressing, 2 tbsp guacamole, 1.5 oz avocado, or 2 tbsp sour cream

Tips:

* You can use 2 1/2 tsp of fajita seasoning (4 1/2 Condiments) instead of the seasonings.

** If you prefer to bake, preheat the oven to 400 degrees and bake for 25 to 30 min or until chicken is cooked through.

*** You can air fry the peppers separately from the chicken if you desire. This would be a great idea if you wanted to add other veggies to your Lean and Green rather than just peppers. If you would like to add lettuce to make a salad or wraps, decrease the peppers to 4 instead of 6. Add 1 cup (72 g) of iceberg lettuce to each serving.


Have you ever had banana peppers on your pizza? I have had them on my sandwiches, but not on my pizza. I may be late to the game, but man oh man... they are amazing on pizza! They are halfway between a pickle and pepper and have a mild, tangy, slightly sweet taste. 


Add marinara sauce, seasoned ground beef, mozzarella cheese, and banana peppers on top of a cauliflower crust and you have a delicious tasting low carb pizza!

I used a Cali'Lite pizza crust which counts as 1/2 a Lean and 3 Greens for the entire crust on the 5 and 1 plan so you can have the whole thing! Currently, the Cali'Lite crusts can only be found online. Some grocery stores carry the Traditional crusts, but keep in mind... you can only have half of the Traditional crust as 1/2 Lean and 1 1/2 Greens. This is why I usually order the Lite crusts online.


Or you can always make your cauliflower crusts. Here is the link! Check it out!


Now go make this pizza! Yum!


Ground Beef and Banana Pepper Pizza

Ingredients:
Lite Cali'flour Foods crust * (1/2 Lean, 3 Greens)
1.5 ounces 95 to 97% lean ground beef, 
seasoned and cooked* (1/4 Lean)
1/4 cup reduced fat mozzarella cheese (1/4 Lean)
2 tbsp Rao's marinara sauce (1 Condiment)
1 ounce sliced banana peppers (1 Optional Snack) 

Directions:
Preheat oven to 400 degrees.
Place crust on a vented pan and bake for about 10 min.
Let cool at least 5 to 10 minutes.
Spread marinara sauce over cooled crust.
Sprinkle cooked ground beef and mozzarella cheese over cooled crust. 
Top with banana pepper slices.
Bake for 5 min or until cheese has melted.
Let cool for 5 min.

1 Serving with
1 Lean, 3 Greens, 1 Condiment and 1 Optional Snack
(Entire pizza)


The recipe calculations are based on the Cali'Lite crusts and not the traditional cauliflower crusts.

*I seasoned the ground beef with salt, pepper, and garlic powder. Don't forget to subtract from your Condiments.

I don't know about you guys, but sometimes you just want a delicious juicy hamburger! Today I was definitely craving one! The Cali'flour flatbreads make excellent "buns" for hamburgers, but without all the additional carbs that are in traditional hamburger buns! Complete your lean and green meal with these delicious jicama fries!


The 5 inch flatbreads are made with only a few ingredients which include egg whites, cauliflower, mozzarella and spices. That's it! Just a few clean ingredients and no added preservatives! Yay!

Two of the flatbreads count as 1/3 Lean and 2 Greens on the 5 & 1 plan, whether you are following the Optavia or Medifast program! Add 2/3 Lean and 1 more Green and you have a full Lean and Green meal.

Use Code SANDY to save 10 % off your entire order!


I made the recipe below so that you had all the calculations done for you if you were itching for a yummy burger using the flatbreads. The recipe below makes 4 burgers (2/3 Lean per burger) topped with G Hughes sugar free bbq sauce! So good!

If you don't have the flatbreads, that's okay! There is a link below that takes you to a recipe using no flatbreads. Enjoy!


Ranch Cheddar Burgers for the Cali'flour Flatbreads

Ingredients:
1 lb 95 to 97% lean ground beef, 12 oz cooked (3 ~ 2/3 Leaner portions)
2/3 cup reduced fat sharp cheddar cheese (1 ~ 2/3 Lean portion)
1 tbsp Hidden Valley ranch seasoning mix (6 Condiments)
4 tbsp G Hughes sugar free bbq sauce, divided (4 Condiments)
2 Cali'flour Foods Flatbreads per burger (1/3 Lean, 2 Greens)

Directions:
Mix all ingredients together in a large bowl.
Form into 4 patties.
Grill until desired doneness.
Serve each burger with 2 flatbreads.
Top each burger with 1 tbsp of sugar free bbq sauce.

Burger only
4 Servings
Per Serving:
2/3 Lean and 2.5 Condiments

Burger with 2 flatbreads
1 Lean, 2 Greens, and 2.5 Condiments
(Add 1 more Green when using the flatbreads)

* Don't have the flatbreads? Here is a recipe which makes 4 full Leans!
Ranch Cheddar Burgers (without flatbreads)
These delicious Asian Beef Vegetable Skewers are perfect for grilling season! I love the assortment of colors you get from the green pepper, yellow squash and cherry tomatoes, but feel free to use your favorite veggies! 

Make sure to marinade the meat overnight so that it will absorb all the yummy flavors from the marinade! For a change of pace, add 2 tbsp of sugar free bbq sauce to the marinade or brush it on at end for a delicious Asian BBQ meal! Now get those grills a burning and start cooking!


Asian Beef Vegetable Skewers

Ingredients:
14 oz raw beef sirloin cut into 1 inch pieces ~ yields 10 oz when cooked 
(2 Leans)

Marinade for Meat:
1/4 cup lite soy sauce (4 Condiments)
1 tsp beef bouillon granules (1 Condiment)
1/4 cup water
1/2 tsp garlic powder (1 Condiment)
1/2 tsp ground ginger (1 Condiment)
1/4 tsp black pepper (1/2 Condiment)

Vegetables:
1 cup sliced yellow squash (2 Greens)
1 cup cherry tomatoes (2 Greens)
1 cup green pepper, cut into 1 inch pieces (2 Greens)

Directions:
Combine ingredients for marinade in a small bowl. Marinate meat overnight in a large ziploc bag. Add veggies to marinade an hour before cooking. Discard marinade and assemble meat and veggies on skewers. Put the skewers of meat and veggies on the grill and cook until desired doneness.

Makes 2 Servings
Per Serving:
1 Lean (5 oz cooked), 3 Greens (1 1/2 cups of veggies) and 2 Condiments per serving (No Healthy Fat required)

* If you would rather weigh your veggies for accuracy, here is the vegetable conversion chart.

** How do we count marinades? Only half of the marinade is absorbed into the meat and veggies so only half are counted as Condiments. The rest of the marinade is discarded. This marinade recipe has a total of 3.75 Condiments per serving so half absorbed into the meat is less than 2 Condiments.

*** Add some variety by adding 2 tbsp of G Hughes sugarfree bbq sauce to the marinade for a yummy Asian BBQ dish! This would give you a total of 4.75 Condiments per serving, but since it is treated as part of the marinade, half absorbed into the meat and is only 2.4 Condiments.


Do you have left over spaghetti squash and don't know what to do with it? Try this dish! Once you have your spaghetti squash prepared, this recipe is a cinch to make!


Add olive oil to a medium sized skillet over medium heat. Add minced garlic and saute for about 30 seconds. Then add raw shrimp and cook a few minutes on each side until cooked through and no longer pink. Set aside.


Add light butter to the same skillet and melt over medium heat. I like to use Land O' Lakes Light Butter with Canola Oil which only counts as 1 Healthy Fat for 1 tbsp.


Once the butter has melted, toss in spaghetti squash, turkey bacon, garlic salt or salt, and black pepper until combined. Add the cooked shrimp and garnish with parmesan cheese. This makes 1 full Lean and Green so enjoy the whole dish!


Spaghetti Squash with Shrimp and Turkey Bacon

Ingredients:
1 tsp olive oil (1 Healthy Fat)
1 tbsp light butter (1 Healthy Fat)
1 tsp minced garlic (1 Condiment)
8 oz raw shrimp, tails removed ~ should yield 6 oz cooked (1 Leanest with 1 oz subtracted)
2 slices turkey bacon, cooked and crumbled (1 oz subtracted from shrimp)
1 1/2 cups spaghetti squash, cooked (3 Greens)
1/4 tsp garlic salt or salt (1 Condiment)
1/8 tsp black pepper (1/4 Condiment)
1 tbsp reduced fat parmesan cheese (1/2 Condiment)

Directions:
In a medium sized skillet over medium heat, add olive oil.
Add minced garlic and saute for about 30 seconds or until light brown in color.  Then add raw shrimp and cook a few minutes on each side until cooked through and no longer pink. Set aside.

Add light butter to the same skillet. Once butter has melted, toss in spaghetti squash, garlic salt or salt, pepper, and crumbled bacon. Heat until warm about 2 to 3 min. Add cooked shrimp and garnish with parmesan cheese.

1 Serving with 
1 Leanest, 3 Greens, 3 Condiments and 2 Healthy Fats per serving


I have been making this recipe for years and did not realize it wasn't up on the blog! The shame! The shame!

This recipe is so easy and only requires 3 ingredients! All you have to do is place the chicken breasts in the crock pot. Top it with your favorite salsa and some taco seasoning. Then let your crock pot work it's magic! When it is done, shred the chicken and mix it with the salsa mixture. So yummy!

I served it with assorted sweet bell peppers I cooked in the air fryer but this would be delicious on cooked cauliflower rice as well! You do need to add 1 healthy fat to this dish. Sour cream or avocado are excellent choices! I hope you enjoy this super duper easy recipe as much as me!

Crock Pot Salsa Chicken

Ingredients:
3 lbs chicken breasts, boneless, skinless (6 Leaner)
1 cup red salsa (16 Condiments)
1 tsp taco seasoning (2 Condiments)

Directions:
Place chicken in the crock pot. 
Top with salsa and taco seasoning.
Cook 6 to 8 hours on LOW or on 4 hours on HIGH.
Shred chicken with fork and stir chicken with salsa mixture.
Serve with your choice of Greens and avocado or sour cream.
This freezes well too!

6 Servings with
1 Leaner and 3 Condiments per serving ~ about 3/4 cup
225 Calories ~ 6 g Fat ~ 3 g Carbs ~ 38 g Protein

* Still need 3 Greens and 1 Healthy Fat per serving such as 1.5 oz of avocado or 2 tbsp sour cream


Move over cauliflower crusts, there is something equally delicious! Spinach pizza crusts or wraps! Another low carb pizza alternative! Add your favorite toppings and it tastes like pizza on flatbread. Yum, yum, yum! This recipe was originally shared by Ursula Garcia awhile back and I love how it is so versatile! It produces a flexible crust which makes perfect pizza crusts or wraps!


For the chicken, bacon, and ranch wrap:

I added 2.5 oz of rotisserie style chicken breasts (1/2 Leaner with turkey bacon) I picked up from the grocery store, 1 slice of turkey bacon (1/2 oz subtracted from protein), 1/4 cup sliced tomatoes (1/2 Green), 1/2 cup lettuce (1/2 Green) and 1 1/2 tbsp Bolhouse Classic Ranch Dressing (1/2 Healthy Fat). With the spinach wrap, it makes 1 full Lean and Green meal!


Look at that beautiful green crust!


To begin the recipe, add spinach, mozzarella cheese, and dried basil to your food processor. Blend well. Stir in egg beaters until completely combined.


Pour mixture onto parchment paper forming a circle making it thin as possible. I like to use another piece of parchment paper on top of the mixture to flatten it out.


Carefully lift the parchment paper off of the mixture.


Bake at 425 degrees for 15 to 17 min or until edges get brown.


If making a pizza, top with your favorite toppings and return to the oven for about 5 more min or until cheese has melted.

For wraps, let cool a few more minutes and then add your desired fillings. A healthy dinner or lunch in less than 30 min! Yes please!


Spinach Pizza Crust or Wraps

Ingredients:
Crust
2 cups spinach (2 Greens)
1/2 cup reduced fat mozzarella cheese (1/2 Lean)
1/2 tsp dried basil (1/4 Condiment)
1/4 cup egg beaters or egg white substitute (1 1/3 Condiments)

Toppings for Margherita Spinach Pizza
2 tbsp low carb marinara sauce ~ I like Lucini marinara sauce (1 Condiment)
1/2 cup reduced fat mozzarella cheese (1/2 Lean)
1/2 cup or 3.17 oz sliced tomatoes (1 Green)
1 tbsp reduced fat feta cheese (1/2 Condiment)

Directions:
Preheat oven to 425 degrees.
Blend spinach, mozzarella cheese, and dried basil in a food processor.
Stir in egg beaters.
Spread mixture on parchment paper.
Tip: I laid another piece of parchment paper over the mixture to flatten it out. Then slowly lifted the parchment paper. 
Bake for 15 to 17 min or until edges are brown.
Add marinara sauce, mozzarella cheese, sliced tomatoes, and feta cheese. 
Bake for an additional 5 more minutes or until cheese has melted.

Spinach crust only:
1 Serving with
1/2 Lean, 2 Greens, and 1.5 Condiments

Margherita Spinach Pizza:
1 Serving with
1 Lean, 3 Greens, and 3 Condiments per serving


Powered by Blogger.