Just in time for Fall! 

Something about the smell of cinnamon and baked apples cooking in the oven during the Fall season brings back such wonderful memories from my favorite season!


Have you ever tried jicama? They are a white fibrous root vegetable native to Mexico, but you can find them in all of the grocery stores here. In my opinion, it is a cross between a carrot and an apple. Delicious eaten raw or cooked! Great thrown into salads! They can be wonderful substitutes for apples because they are subtly sweet, crisp and crunchy. The only difference you may notice is that they don't get really soft like apples when baking, but  they taste pretty darn good.


I peeled and cubed the jicama in very small pieces (like how you would cube potatoes for hash browns), but you can also slice them really thin like apple slices. You want to make the pieces small or thin so they cook easier and faster. 


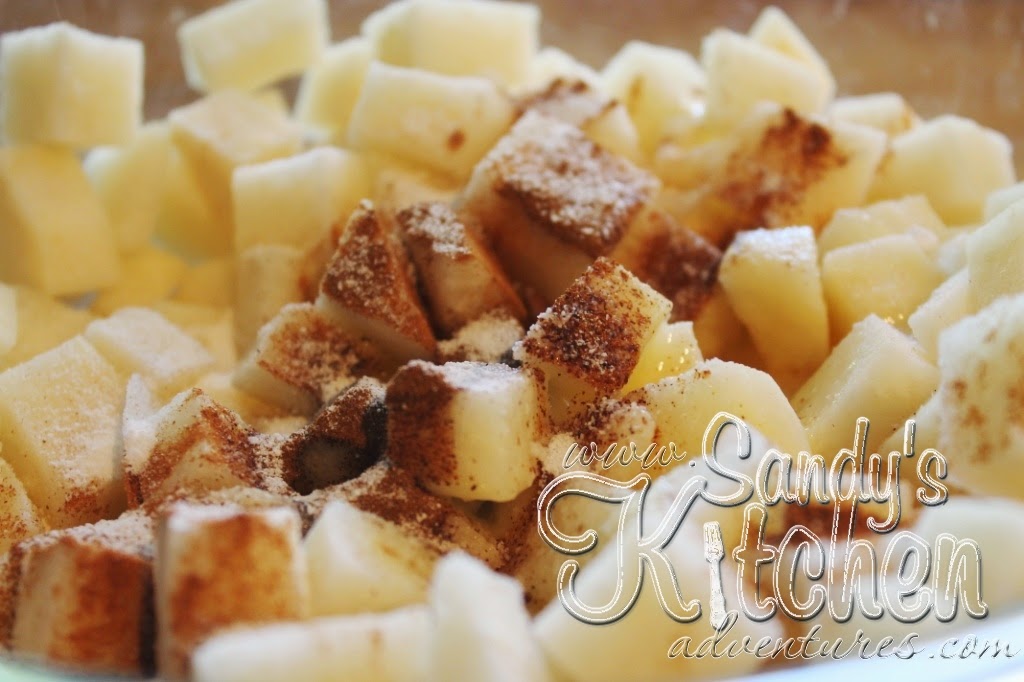
Add some cinnamon, apple pie spice and stevia along with the melted butter. If you do not have apple pie spice, it is okay. You can always double up on the cinnamon or add more cinnamon with a touch of nutmeg and allspice.


Get it all the pieces of jicama evenly coated with the spices and butter.


Spread the pieces over a foil lined baking pan.


Cover with foil and bake for 20 minutes. Then uncover and bake for 15 more minutes.


I made three 1 cup servings, but you could always have only 1/2 a cup as 1 Green and have other veggies as your other Greens so that this could be a little dessert with dinner. I hope you enjoy it as much as me! Delicious!


Baked Cinnamon Jicama (Apples)

Ingredients:
3 cups jicama peeled and cubed or sliced thin (6 Greens)
3 tbsp light Land O' Lakes Butter with Canola Oil, melted (3 Healthy Fats)
1/4 tsp apple pie spice (1/2 Condiment)
1/4 tsp ground cinnamon (1/2 Condiment)
3 packets stevia in the raw (3 Condiments)

Optional Toppings:
2 tbsp Walden Farms caramel syrup (1 Condiment)
2 tbsp Fat Free Reddi Whip (1 Condiment)

Directions:
Preheat oven to 350 degrees. Line a cookie sheet or baking pan with non-stick foil.

Mix jicama with melted butter in a medium sized bowl. Add cinnamon, apple pie spice, and stevia stirring until combined. Pour onto a foil lined pan. Cover with foil. Bake for 20 minutes. Uncover and bake an additional 15 minutes.

The jicama will not get completely soft when baking. Expect to have a slight crisp center when eating and a slightly sweetened taste. Enjoy!

3 (1 cup) servings

Per Serving:
2 Greens, 2 Condiments and 1 Healthy Fat
(still need 1 more Green)


I am so excited to share this recipe with you guys! Both the hubs and I approve and that says a lot considering hubby loves his whole wheat pasta! In the past, I would have normally made this dish with pasta, but spaghetti squash works really well for this dish. If you haven't tried spaghetti squash yet, then you don't know what you are missing! It has a nice slight crunch and packed with nutrients, but it does resemble spaghetti noodles, hence the name, "spaghetti" squash. I don't think you will miss pasta, once you try this dish. If you need a tutorial on how to prepare spaghetti squash using a microwave, you can go HERE.

I also substituted Greek yogurt for sour cream which is often found with Mexican dishes. Greek yogurt is so versatile because it can be a healthier substitute for sour cream, mayonnaise and even butter! It helps make dishes thick and creamy without adding all the calories. You gotta love that!

This casserole does freeze well so that is a plus in my book. You got to love those make ahead freezer meals, especially for those busy week nights! It will definitely be a meal found in my freezer.


Yummy comfort food and the perfect dish if you are craving Mexican!


Substituting Greek yogurt for sour cream helps lighten this dish without skimping on flavor! The sauce is a blend of Greek yogurt, enchilada sauce, with a little bit of chili powder to give it extra kick.


Adding the chopped green pepper while the ground beef is cooking softens them up some and gives the beef more flavor.


Rotel tomatoes also help add more zest to the meat with it's perfect blend of tomatoes, green chili peppers and spices. Love this stuff in my Mexican dishes.


Look at that color! Christmas anyone? :)


Drain all the fat and liquids from the eat using a strainer. Return the meat back to the skillet and add the yummy sauce you prepared earlier. Stir until all the lumps from the cream cheese disappear and the sauce becomes smooth.


Next add the spaghetti squash and give it a good stir. Pour the mixture into a casserole dish.


Top with cheese and bake until the cheese is melted. Delicious!


Mexican Ground Beef Casserole

Ingredients:
4 1/2 cups spaghetti squash, cooked (9 Greens)
1 can Rotel tomatoes (2 1/2 Greens)
1/4 cup green pepper, chopped (1/2 Green)
1.25 pounds 93% lean ground beef (3 Leans)
2/3 cup shredded 2% reduced fat Mexican style cheese (2/3 Lean)
1/2 cup 2% plain Fage Greek yogurt (1/3 Lean)
1/2 cup red enchilada sauce (8 Condiments)
3 tbsp reduced fat cream cheese (3 Condiments)
1/2 tsp chili powder (1 Condiment)

Directions:
Preheat oven to 350 degrees. 

In a medium sized bowl, combine enchilada sauce, Greek yogurt, cream cheese, and chili powder. Stir until combined. It is okay if the mixture is a little lumpy from the cream cheese. The cream cheese will eventually melt when combined with the warm ground beef and spaghetti squash. Set aside.

Over medium high heat, add ground beef, chopped green peppers, and can of Rotel tomatoes to a large skillet. Cook until ground beef is no longer pink and green pepper is tender. Drain meat of all fat and liquid.

Add spaghetti squash and enchilada sauce mixture to the ground beef. Stir until everything is combined.

Pour the mixture into a casserole dish. I used a deep 9 inch square casserole dish. Top with Mexican style cheese. Bake for about 25 minutes or until cheese is melted.

Makes 4 Servings
Each serving provides
1 Lean, 3 Greens, and 3 Condiments


I absolutely love curry so I wanted to try it on some roasted cauliflower. Wow! It was delicious! It was sooo good that I had to have it 3 days in a row! Yes, it was that yummy! I just love how curry adds a warm spice flavor, along with the smoked paprika, and bring boring cauliflower to life.


Hubby gives it two thumbs up too! He is one of the reasons why I had to make it again... and again.... and again. I think by the third day, we were ready to move on to a different veggie :)


It is so easy to make! You could use one medium head of cauliflower and cut it up into bit sized florets or you could buy the cauliflower already cut up and ready to go in the produce section.


I used three different spices: curry powder, smoked paprika and garlic salt. I think they make a nice combination of spices. Feel free to use regular salt if you don't have garlic salt. As for the smoked paprika, I would rather stick with smoked paprika rather than regular paprika because it gives a sweet smokey taste.


Add 1 tbsp of olive oil to the bowl of cauliflower. Toss the oil and cauliflower around in the bowl. Try to make sure all the cauliflower florets get covered with the oil as much as possible. Pour the cauliflower into a gallon sized Ziploc bag.


Sprinkle the spice mixture over the cauliflower in the bag. Shake the bag and massage the cauliflower with the spices so that all the florets are covered.


Pour the cauliflower onto a baking sheet lined with non-stick foil.


Bake at 425 degrees for about 25 to 30 minutes, turning once half way through. Mmmmm... delicious curry roasted cauliflower!


Curry Roasted Cauliflower

Ingredients:
4 1/2 cups raw cauliflower cut into bite-sized florets (9 Greens)
1 tbsp olive oil (3 Healthy Fats)
1 tsp curry powder (2 Condiments)
1/2 tsp smoked paprika (1 Condiment)
1/2 tsp garlic salt (2 Condiments)

Directions:
Preheat oven to 425 degrees. Line a baking pan with non-stick aluminum foil. Combine oil and cauliflower florets in a gallon size Ziploc bag and shake the bag until combined. Try to make sure all the florets are coated with oil. Then put the curry powder, smoked paprika and garlic salt in a small bowl and stir until combined. Pour the spice mixture over the cauliflower florets and shake the bag until all the pieces are coated with the spice mixture.

Spread the cauliflower florets on prepared pan lined with non-stick aluminum foil. Bake for about 25 minutes; stirring halfway through.

3 Servings with 
3 Greens, 1.7 Condiments, and 1 Healthy Fat per Serving


This is Not Your Mama's Alfredo Sauce for a reason. This recipe doesn't have all the cream, butter, flour and other unhealthy ingredients that traditional Alfredo recipes might have. It actually has only a few ingredients, but with those few ingredients, it packs a ton of flavor.


What I like most about this sauce is that it is smooth, thick and creamy. It really sticks to the squash noodles and chicken. No watery sauce for me!


I used my Ninja to blend the ingredients together but you can use any small blender you like. You just want to blend until all the ingredients have a smooth texture, resembling sauce. I added cottage cheese, garlic powder, Parmesan cheese, unsweetened almond milk and black pepper. That's it! You are done! Easy peasy!


The sauce is actually a great source of protein because of the cottage cheese and it doesn't have a lot of fat! It is right up my alley!


You can kind of see the thickness in this photo. Feel free to add a little more almond milk if you don't want the sauce as thick.


Slap on that sauce!

I chose to serve the sauce on spiraled yellow squash and zucchini so that it resembled pasta. My favorite spiralizer is Paderno which I got from Amazon. Right now it is running about $35 with free shipping, but the price is always changing so check it out. They are really simple to us. You just press the zucchini against the blade of the slicer and crank the handle. As you crank the handle, the spirals come out on the other side. The best part about this machine, is that you don't have to worry about your hand coming in contact with the blade while you are spiraling. Also, this machine will take out the core of the squash which has the seeds. The seeds prevent the noodles from holding together, so you want to make sure the core isn't included.

Another option is the Veggetti which is also on Amazon but I think you can find it in some of the big box stores such as Target and Bed Bath and Beyond. This runs around $13.

You can also use any julienne peeler you like and get great results. These are easy to find and run around $10 or less. If you use one of these peelers, you would pass the peeler down the side of the squash, lengthwise. When you approach the seeds, turn the zucchini and slice another side.

Chicken Alfredo never looked so good! With added color from the squash, healthy nutrients from using veggies instead of pasta, and creamy sauce packed with protein... what more could I ask for in kick starting my weight loss? Enjoy!


Not Your Mama's Chicken Alfredo

Ingredients:
4 oz grilled or baked chicken, sliced or diced (2/3 Leaner)

For Alternative Pasta:
1 1/2 cups yellow squash and/or zucchini, spiralized (3 Greens)
1 tsp olive oil (1 Healthy Fat)
1/4 tsp dried basil (1/8 Condiment)

Alfredo Sauce:
1/2 cup 1% cottage cheese (1/3 Leaner)
1/8 tsp salt (1/2 Condiment)
1/2 tsp garlic powder (1 Condiment)
1 tbsp reduced fat grated Parmesan cheese (1/2 Condiment)
1 tbsp unsweetened almond milk (1/16 Condiment)
1/8 tsp Fresh ground pepper (1/4 Condiment)

Directions:
Prepare your squash. You can peel your squash so that it resembles pasta or leave the peel on to add more color to the dish. I like to leave it on because the peel has extra fiber that can regulate your digestive system. Cut the ends off and discard. Next decide which gadget you want to use to make your noodles. Measure out 1 1/2 cups.

Add 1 tsp olive oil to a medium skillet and heat over medium-high heat. Add spiraled squash to the oil and cook until squash gets tender for about 2 minutes. Add basil and any other additional seasonings such as salt, pepper, or garlic powder if desired. Put on a plate and set aside.

To make Alfredo sauce, combine cottage cheese, salt, garlic powder, Parmesan cheese, almond milk and pepper in a small blender until mixture is smooth and creamy. Pour into a microwave safe dish and heat until warm (about 45 sec to 1 min), stopping the microwave every 15 seconds to stir. Make sure the cottage cheese doesn't get too hot because cottage cheese and heat do not mix well. It will start to separate, get stringy, and watery. Once it was mixed with the squash and chicken, I had no problems with re-heating.

Place cooked diced chicken over squash noodles and then pour warm sauce on top. Enjoy!

1 Serving with 
1 Leaner, 3 Greens, 2.5 Condiments, and 1 Healthy Fat

  This cauliflower alfredo is creamy and delicious with a great mild flavor. You can use this sauce with green beans, cauliflower "rice", shiratake noodles, zucchini noodles, and so on . Or try pairing it with shrimp or chicken!


Straight from the blender!


One serving of sauce served over 6 oz diced grilled chicken and 1 cup of spaghetti squash.


Look at that creamy goodness!


 I stored the left overs in these Rubbermaid containers. Just put one serving (1/2 cup) of sauce in each container and then freeze. That's it! When you are ready to eat, thaw and re-heat.

Cauliflower Alfredo Sauce

Ingredients:
1 tbsp garlic, minced (3 Condiments)
1 tbsp light Land O' Lakes butter with canola oil spread (1 Healthy Fat)
3 cups cauliflower florets - I used frozen (6 Greens)
1 1/2 cups water
1 1/2 cups lower sodium vegetable or chicken broth or water to limit your salt intake (1 1/2 Condiments for broth)
1/2 tsp salt (2 Condiments)
1/4 tsp black pepper (1/2 Condiment)
1/4 cup unsweetened almond milk (1/4 Condiment)
1 tbsp Kraft grated Parmesan cheese (1 Condiment)

Directions:
Saute garlic with butter in a large non-stick skillet over low heat. Cook for several minutes until garlic is soft and fragrant but not browned (browned or burnt garlic will taste bitter). Set aside.

Bring the water or broth to a boil in a large pot. Add cauliflower and cook 7 to 10 min or until fork tender. If using frozen cauliflower, follow the cooking time on the back of the package. Do not drain.

Use a slotted spoon to transfer cauliflower to a blender. Add 1 cup of the cooking liquid, garlic/butter, salt, pepper, almond milk and Parmesan cheese to the blender. Blend or puree the sauce for several minutes or until smooth. Serve hot!

Makes about 3 cups or 6 (1/2 cup) servings)

1 Green, 1 and 1/3 Condiments, and 1/6 Healthy Fats per 1/2 cup serving

*Add a laughing cow cheese wedge, if desired to increase your healthy fat serving. 1 light or flavored laughing cow cheese wedge is 1 condiment or 1 original laughing cow cheese wedge is 1 healthy fat.

* I made it a meal by adding 1/2 cup sauce, 1 cup spaghetti squash and 6 oz of chicken (which needs 1 healthy fat). 


Do you want to make sure you are getting your water in? Then have a dish that is spicy! Well, this dish isn't extremely spicy, but it has just enough heat to make me grab my water. You can adjust the crushed red pepper as needed but don't be a wimp!

I really like this recipe. The flavors of the different ingredients taste delicious together and reminds me of a yummy Italian dish! Tomatoes, zucchini, garlic, basil and shrimp make a delicious meal. Add the little bit of crushed red pepper and oh my... it really adds some oomph to your dish.


First you need to gather your ingredients!


Heat olive oil with garlic over medium high heat until garlic is lightly browned.


Add your zucchini. I used a Paderno spiral slicer that I got from Amazon. I absolutely love it! It takes a minimal amount of time to slice the zucchini and they make the dish look so pretty :) Not too mention... clean up s a breeze!


Stir in the tomatoes. As the tomatoes cook with the zucchini, water is released from the zucchini. It will make a wonderful tomato sauce. The best part is that you don't have to add too many condiments since the tomatoes are already seasoned with Italian seasoning.


Then you add your shrimp. I used the frozen shrimp that I thawed out. It was already cooked, peeled, deveined and tails removed. I only used 7 oz because I didn't cook the shrimp long in the sauce so it only shrunk a little. If you want to add more shrimp to make sure you get the full 7 oz, please do so.


Add the fresh basil and crushed red pepper. I love fresh basil with tomatoes! Yum!


Simmer for an additional 5 minutes to make sure all the flavors fuse together.


Dinner is served!

Spicy Tomato Shrimp with Zucchini Pasta

Ingredients:
2 tsp olive oil (2 Healthy Fats)
1 clove garlic, minced (1 Condiment)
1/2 cup zucchini, chopped or spiral sliced (1 Green)
1 cup Great Value Italian diced tomatoes (2 Greens)
7 oz shrimp, cook, peeled and deveined (1 Lean)
1/4 tsp crushed red pepper flakes (1/2 Condiment)
1 tbsp fresh basil, chopped (1/16 Condiment)

Directions:

In a medium sized skillet, add 2 tsp olive oil and garlic over medium high heat. Saute garlic until lightly brown.
Add zucchini and cook for 2 to 3 min or until zucchini is slightly soft.
Stir in the diced tomatoes and shrimp.
Sprinkle fresh basil and crushed red pepper over the mixture and simmer for an additional 5 minutes or until basil is wilted and heated thoroughly.

1 Serving with 1 Lean, 3 Greens, 1.56 Condiments, and 2 Healthy Fats


I have been hearing about kale chips for some time now, but never got around to making them until now. I never thought I would get a delicious treat out of these green veggies, but boy was I surprised! They were crispy, but very delicate, almost to the point of being crumbly. They had a nice salty flavor, but you don't have to use just salt. I think I am going to try garlic and parmesan or possibly a little soy sauce for an Asian flavor next time. Variety is key for me. I will also tell you that they are extremely addictive and just like potato chips... you can't eat just one, at least I can't! I did learn not to sprinkle too much sea salt on the chips because the cooking process gives them a salt like taste as they get crispy so go easy on any spices or flavorings you decide to use.


These kale chips are wonderful for movie night! My husband and I enjoyed these yummy snacks but my son and dog definitely wanted a piece of the action too! My son was more interested in crumbling these chips between his fingers, while my dog just wants to eat EVERYTHING! For a night of entertainment, these were easy and yummy to make!


Separate the kale leaves from the thick stem. Then tear the kale into pieces or cut them with a knife. I used my fingers. No need to make the leaves pretty. Wash the leaves in water and let them air dry or you can use a salad spinner to dry them faster. 


Spray the kale with olive oil cooking spray and massage the leaves so that the olive oil is distributed evenly. Then spread the leaves on a parchment lined cookie sheet in a single layer and sprinkle with salt.


Bake at 350 degrees for about 10 to 15 min turning the leaves halfway through. Cook until the edges start to get a light brown color, but don't burn them. Burnt chips do not taste very good. Then enjoy these delicious crispy veggie chips!


Kale Chips

Ingredients:
4 1/2 cups or 11 oz kale, after leaves are removed from stems (9 Greens)
Olive oil cooking spray or 1 tbsp olive oil (3 Healthy Fats)
1/4 tsp sea salt or your favorite seasonings (1 Condiment)

Directions:
Preheat oven to 350 degrees. Line a cookie sheet with parchment paper. Remove the center stem from the leaves and discard. Tear the leaves into 2 to 3 inch pieces. Wash the leaves thoroughly and let dry. 

In a large bowl add kale and spray lightly with olive oil cooking spray or drizzle with olive oil. Massage the oil into the kale to distribute evenly. Place the kale on the prepared cookie sheet in single layers. Sprinkle with salt.

Bake until the edges are brown but not burnt, 10 to 15 min, turning halfway through. Watch closely so they don't burn! Try 10 min first and add more time if needed.

How to store them:
Your best option is to store them in a dry paper bag or in an air tight container at room temperature. If they're less crispy the next day, dry them out a bit in the oven at a low temperature (175 F) for 15 minutes.
Over time, the chips will absorb moisture from the air, so a batch will probably last a few days (a week at the most).

 Try experimenting with various spices such as smoked paprika, garlic, Italian spices, parmesan cheese, nutritional yeast, etc.

Makes 3 Servings
Each serving provides
3 Greens , 1 Healthy Fat and 1/3 of a Condiment

To air fry:
Air fry at 280 degrees for 6 to 8 min, shaking the basket halfway through. Make sure to check the basket often after 6 min so you do not overcook it.

This one has comfort food written all over it! I love stuffed cabbages, but they can be a little time consuming to make and this recipe was way more easier to prepare! No stuffing required! Ground beef, tomatoes and cabbage always make a wonderful combination and will be great served on a cool or cold day.

The 1/8 tsp of cinnamon left just a hint of cinnamon flavor, which is just the way I like it. You can always leave it out if you don't care for cinnamon in your meats. Cook the ground beef and chop the cabbage the night before and you can have this recipe made in less than 30 minutes. Definitely a keeper!


Brown your lean ground beef and weigh out 25 oz cooked.


Add chopped cabbage to the 25 oz of cooked ground beef.


Then add the diced tomatoes, vinegar and water.


Next add the spices.


Stir until combined, bring to a boil, and then cook over low heat for about 30 minutes.

Divide into 5 equal portions. This is a great meal to freeze for later!


Unstuffed Cabbage Roll

Ingredients:
25 oz 93% lean ground beef, cooked (5 Leans)
1/2 tsp onion powder (1 Condiment)
1/2 tsp garlic powder (1 Condiment)
4 cups cabbage, chopped (8 Greens)
2 (14.5 oz each) cans Great Value Italian diced tomatoes (7 Greens)
1 tbsp. cider vinegar (1/4 Condiment)
1/8 tsp ground cinnamon (1/4 Condiment)
1/2 tsp ground black pepper (1 Condiment)
1 tsp sea salt (4 Condiments)
1 packet stevia - optional (1 Condiment)
1/2 cup water

Directions:
Combine cooked ground beef with cabbage, diced tomatoes, vinegar and water over medium high heat.

Add  garlic powder, onion powder, cinnamon, black pepper, salt and sweetener. Bring to a boil. Cover and simmer for 30 minutes or until cabbage is tender. Divide into 5 equal portions.

5 Servings with 
1 Lean, 3 Greens, 2 Condiments per serving


Powered by Blogger.