Every once in awhile I like to add cottage cheese to my Medifast shakes. It helps me on those days when I am feeling extra hungry or before a tough workout. You can sneak it into any flavored shake, but Dutch Chocolate and French Vanilla are my favorites. Mainly because you can come up with so many delicious flavor combinations just by adding powdered peanut butter, a variety of extracts, or sugar free syrups! The possibilities are endless!

Cottage cheese makes the shakes come out smooth, thick and creamy... just like a yummy milkshake! Even if you can't stand the taste of cottage cheese, you have to try it in a shake at least once. I don't think you can really taste the cottage cheese flavor anyways and that is coming from a person who isn't a big fan of it.

The Medifast shakes already have 14 grams of protein, but adding an extra 1/2 cup of cottage cheese adds another 14 grams of protein! That's almost 30 grams of protein for just a little shake! Also, cottage cheese has a high content of casein protein, which is a longer lasting protein, so it helps keep you fuller longer. That makes my tummy very happy!


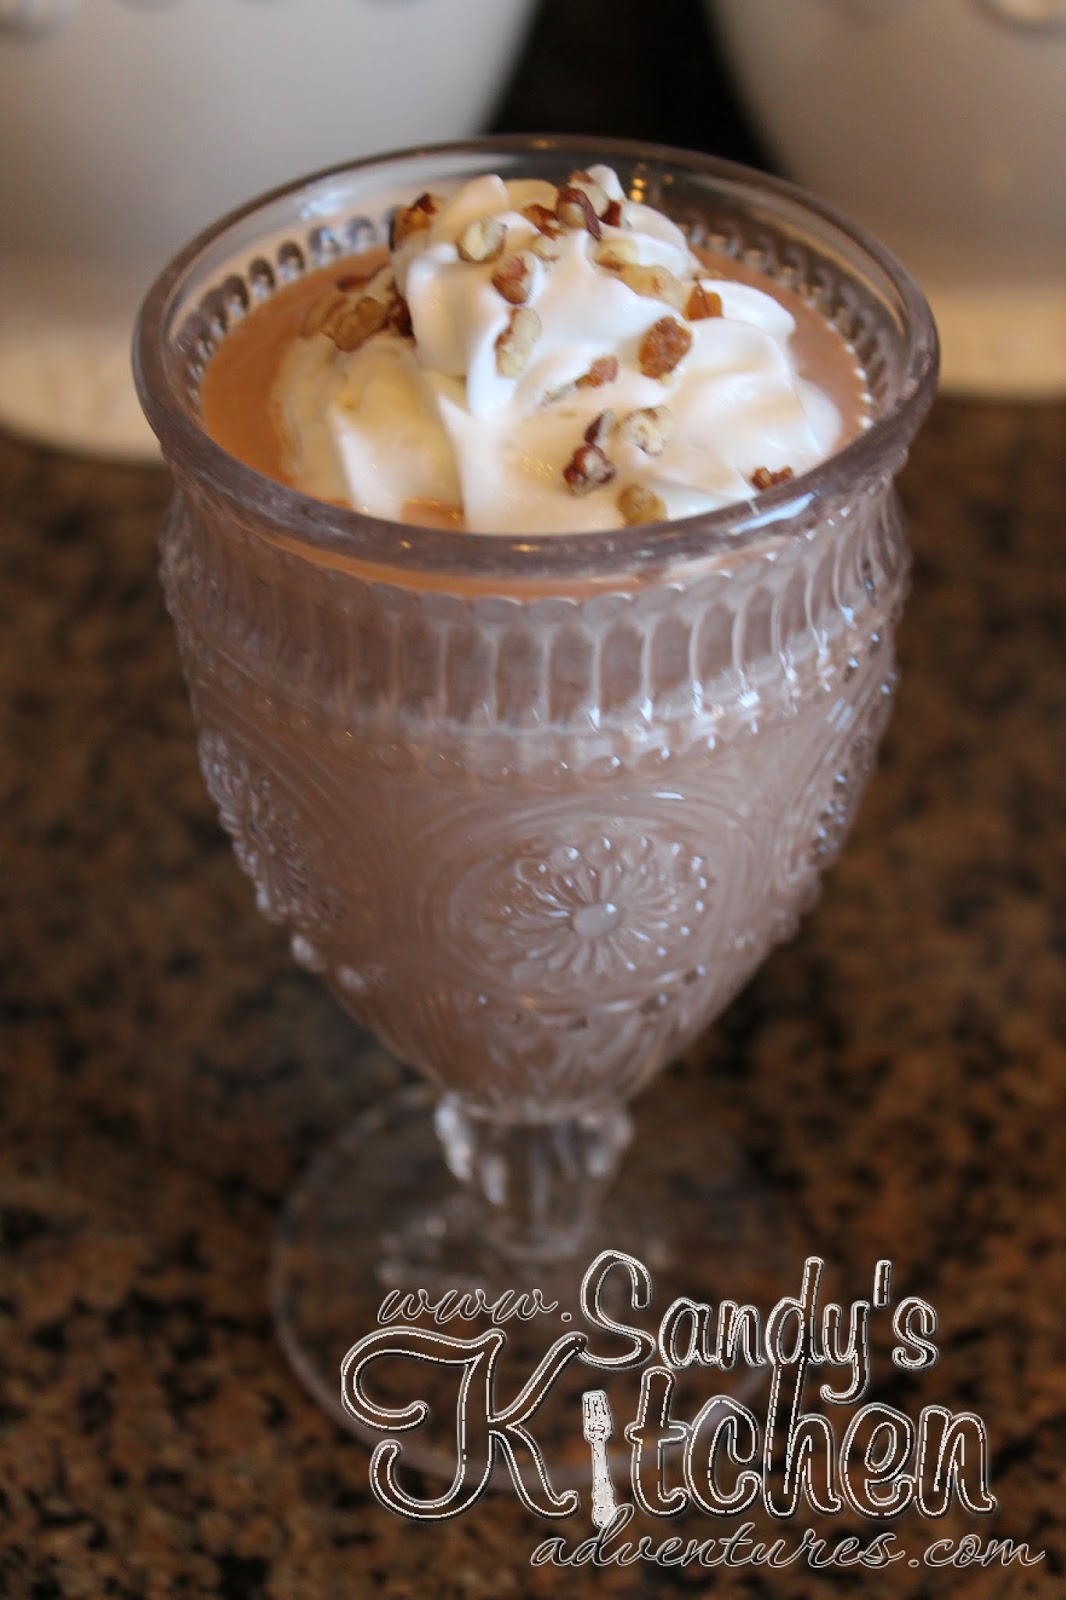
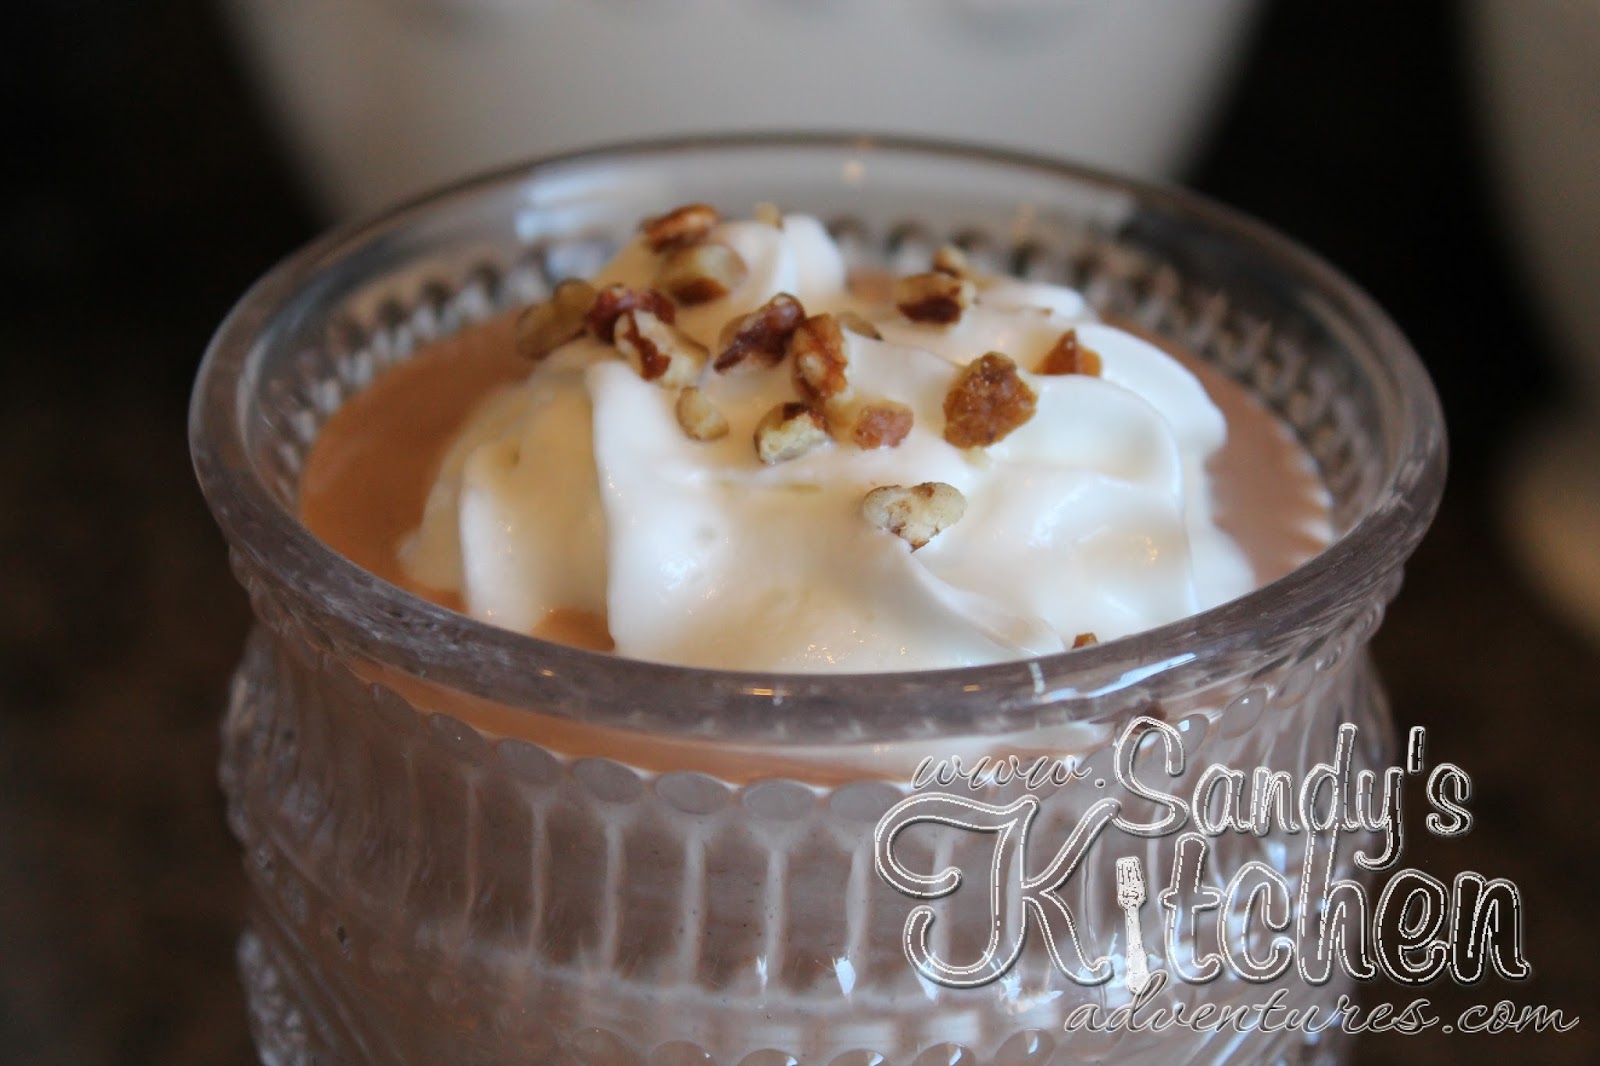
Adding cottage cheese to the Dutch Chocolate shake makes it taste like chocolate cheesecake! I like chocolate anything, but chocolate cheesecake? I am in heaven! I added unsweetened cashew milk, vanilla extract, and ice. Then I topped it with Reddi Wip and a light sprinkle of walnuts. Sometimes I like to use a drizzle of Walden Farms Chocolate Syrup on top, but unfortunately I was out. Feel free to add extra sweetener, such as Stevia Sweet Leaf Vanilla Drops or Stevia packets, if you like. I think it tastes fine without it.

Enjoy this delicious twist on the shakes!


Chocolate Cheesecake Shake

Ingredients:
1 packet Medifast Dutch Chocolate Shake (1 Meal)
1/2 cup 1% cottage cheese (1/3 Lean)
1/2 cup unsweetened cashew or almond milk (1/2 Condiment)
1/2 tsp vanilla extract (1/2 Condiment)
1 cup ice

Optional Toppings:
2 tbsp or 5 grams fat free Reddi Wip (1 Condiment)
7 walnut halves, chopped - I used a little sprinkle as a garnish (1 Snack)

Directions:
Combine chocolate shake mix, cottage cheese, cashew or almond milk, vanilla extract and ice in a blender. Blend until mixture is smooth.

1 Serving with 1 Meal, 1/3 Lean, 2 Condiments and 1 Snack


Fall is coming just around the corner and everything pumpkin or pumpkin spice is everywhere! I recently just saw Limited Edition Pumpkin Spice Twinkies at the grocery store! I mean it has got to be good because the box says limited edition right? Maybe. Maybe not, but they sure did look good. Although they were extremely tempting, I did not cave in. Mainly because my husband just gave me that look as he said "Really?". I said, "Ummmm... of course not. I was just looking.", but in my head I was thinking... but they are pumpkin spice! You just don't see it too often. Pumpkin spice things ONLY come out a few weeks of the year. Oh well. I guess I am going to have to make my own pumpkin spice things to satisfy my cravings.


Of course the first thing I had to make was Starbuck's Pumpkin Spice Frappuccino. Oh my goodness! That coffee drink just screams Fall! I love the combination of warm spices that make up pumpkin spice. Then you add it to cold coffee with a few other ingredients and you have yourself one heck of a drink. If you do not have pumpkin spice at home, don't fret! You can can easily make it yourself. 

Here is the recipe:

Pumpkin Spice

1 tsp ground cinnamon
1/4 tsp ground nutmeg
1/4 tsp ground ginger
1/8 tsp ground cloves

Combine all ingredients together and store in an airtight container.

Now that you know how to make pumpkin spice, don't go putting it everything. People may start to look at you weird. Although, you could always blame it on the Fall season. I do!


One thing I wanted to add is that we can have pumpkin puree on the Medifast plan. Hallelujah because you know how much I love pumpkin! We can not have a whole bunch of it, but 1 tbsp of pumpkin puree is 1 Condiment. A little bit of pumpkin can go a long way, especially in your shakes! I usually get the canned pumpkin because it is convenient. You are probably wondering well gosh... that whole can of pumpkin is going to go to waste if I can only have one tbsp at a time. You are right, but I found a way to save my pumpkin! I put one tbsp of pumpkin in each compartment of an ice tray.


Then I freeze the tray and then add the pumpkin cubes into a Ziploc bag. I used a small sandwich sized Ziploc bag for one small can of pumpkin puree. Make sure you do not use the pumpkin pie filling which is usually next to the pumpkin puree.


 Then when you need one tbsp of pumpkin puree for your shake, your brownies, your pancakes or whatever you may have in mind, just grab one of those frozen cubes. It is easy peasy because you already measured it out. 

To make the Pumpkin Spice Frappuccino, add one of these pumpkin puree cubes in a blender.


Then add really cold coffee. I like to use this coffee because it is really bold and strong. I say the stronger the better when it comes to coffee!


Next add pumpkin spice and ground cinnamon. I actually had some pumpkin spice in my pantry, so I didn't have to use the recipe above. Once I do run out, I will be making more!


I added Walden Farms Maple Walnut Syrup to the coffee drink because I think it enhances the flavor. I am not a huge fan of all Walden Farms products, but I do like their sugar free syrups. This includes their pancake, chocolate, and caramel syrups. You could also use Medifast's pancake syrup if you have it or a little bit of maple extract. If you do not have any of these ingredients, I am sure the drink will still taste great without them.


Add everything into a blender with a few more ice cubes. Blend and enjoy this delicious treat! 


Pumpkin Spice Frappuccino

Ingredients:
3/4 cups cold coffee
1/2 cup unsweetened cashew milk (1/2 Condiment)
1 tbsp pumpkin puree (1 Condiment)
1/8 tsp ground cinnamon (1/4 Condiment)
1/8 tsp pumpkin spice (1/4 Condiment)
1 tbsp Walden Farms Walnut Maple Syrup or sugar free pumpkin pie syrup such as Torani or Da Vinci (1/2 Condiment)
1 pkg Optavia Vanilla Shake (1 Fueling)

Directions:
Combine all ingredients in a blender.
Add desired amount of ice and blend until smooth.

Makes 1 Serving
1 Fueling and 2.5 Condiments


I wanted to let you guys know about some wonderful products I recently tried that could help make creating healthy meals easier. Stacey Hawkins is the mastermind behind Time Savor Gourmet Solutions which consists of a variety of products such as spices, seasonings, oils, and panko breadcrumbs! There are plenty of spices and seasonings to choose from! I am sure you will find one (or more) that will complete any dish you might be craving. Not to mention there are four flavored oils (luscious lemon, valencia orange, roasted garlic and a balsamic mosto cotto) to choose from to perk up any dish. 


Stacey has 5 cookbooks out right now on her website www.StaceyHawkinsShop.com. I currently have Lean, Green, Low Carb Recipes which is a must have  if you are on the Medifast program. There are lots of recipes to choose from and she breaks down the lean, green and healthy fat info for each recipe. She uses Time Savour Gourmet spices and seasonings in all of her recipes, but there is a list of substitutes given towards the beginning of the cookbook for what you could use in place of the Time Savour Gourmet product. For example, Garlic Gusto Seasoning (the Time Savour Gourmet product) can be substituted with minced garlic and roasted garlic. Keep in mind, the list does not give the proportions of the spices you should use when substituting, which is why she recommends using her products for the best results. 

What makes these recipes so great? Well, they are sooo quick and easy to make. They don't require a lot of ingredients and the most important reason is? They taste great! Not to mention the recipes are healthy too! I have made quite a few recipes already because my family has enjoyed them so much.


Pictured below is Bob's Mouthwatering Meatballs and a 2 Minute Tomato Sauce. As you can see, the recipe only requires a few ingredients. Super simple and super fast! I made this meal in under 25 minutes! My family gave this recipe two thumbs up!


A yummy hearty meal the whole family can enjoy without being a slave to the stove!


The recipe calls for Garlic Gusto and Viva Italiano Seasoning for both the meatballs and the sauce. That's it!  Well, besides a bit of sea salt and fresh black pepper. Lots of flavor for just a few ingredients.


A closer look at the Garlic Gusto Seasoning. Mmmmm garlic!


This one is the Viva Italiano Seasoning.


Mix the seasonings with ground beef. No eggs or bread crumbs required :)


Form the meat mixture into 2 inch balls and then bake! I baked them for about 15 minutes, but the recipe stated 10 to 12 minutes. Make sure you do not over cook them or they can get tough. No one likes tough meat right?!


While the meatballs were cooking, the sauce was a snap to through together. I used canned Italian diced tomatoes mixed with the Garlic Gusto and Viva Italiano Seasonings. Delicious!


I served it over cooked spaghetti squash. Healthy comfort food calling my name! A winner for sure!


This is another one of her products I tried which happens to be my current favorite! Cinnamon Chipotle BBQ Dust combines the smoky flavor of chipotle peppers with the sweet taste of cinnamon. This is wonderful to use in chili or as a rub for chicken or pork. I made a wonderful pork and veggie kebab with this seasoning. I just sprinkled this on some cubed pork and a combination of veggies consisting of yellow squash, green peppers, and cherry tomatoes. Skewered the pork and veggies on a metal skewer. Then sprinkled on some sea salt and fresh black pepper. Then grilled. Again, super easy and super fast to make. I should've taken a photo... I know, but I was too busy eating to think about getting my camera :) It wasn't a planned meal, but rather something I threw together last minute. Sometimes those last minute meals can be the best!


I did take a photo of this yummy recipe! This is Stacey's Chipotle Cinnamon Turkey Sloppy Joes which is found in her Slow Cooker Favorites cook book. I love slow cooker recipes! Throw the ingredients in the slow cooker in the morning and dinner is ready by the time you get home. This recipe uses ground turkey, tomato sauce, tomato paste, green peppers, red wine vinegar, worchestershire sauce, a packet of stevia and the Chipotle Cinnamon BBQ Dust. A wonderful combination of flavors for this family favorite!


I served this with a side salad, but another great option is to make them into lettuce wraps or maybe stuff the meat mixture in a zucchini boat! How about a stuffed pepper? I will definitely be making this again!


As mentioned earlier, Time Savour Solutions also has a line of flavored oils. They are all great for adding flavor to enhance any meal. All four are great for sauteing or roasting vegetables, meats, or even drizzled on a salad. The balsamic mosto cotto is fabulous in a caprese salad made up of fresh mozzarella, tomatoes, and lettuce! Pure heaven!


The Luscious Lemon Oil is perfect for Shrimp Scampi which happens to be my favorite seafood dish! Of course, I had to try Stacey's recipe for Shrimp Scampi Seafood Medley which is also in the Lean, Green, Low Carb Recipes cookbook. She uses a combination of shrimp, bay scallops and crab meat, but I used shrimp only. The only other ingredients are Lemon Oil and Time Savour Gourmet Skinny Scampi Seasoning. I finished this recipe in only 10 minutes! Another quick and easy recipe!


I used some spiralized yellow squash as my pasta which I spiralized with my Paderno Spiral Vegetable Slicer. You get a delicious pasta substitute in a matter of minutes. I got mine from Amazon and they are less than $30! I highly recommend getting one of these contraptions. I sauteed the squash in a little bit of Roasted Garlic Oil and added a sprinkle of the Shrimp Scampi Seasoning. Delish!


Another great recipe from Stacey's Lean, Green, Low Carb Recipes cookbook! Roasted Lemony Garlic Green Beans! It uses only the Lemon Oil and Shrimp Scampi Seasoning. A fabulous side dish that goes well with almost everything!


Then I decided to come up with this concoction! I used a drizzle of fresh lime juice and a sprinkle of Chipotle Cinnamon BBQ Dust on sliced jicama shaped like fries. Salty and sour, yet so crisp and refreshing! No cooking required! Jicama is wonderful eaten raw. 


I also tried a drizzle of lemon juice with a sprinkle of Time Savour Gourmet Sinful Cinnamon and stevia over jicama fries. My new favorite snack! A hint of guilt free apple pie!

There are tons of products to try on her website! None have disappointed me so far! Her cookbooks and products have really saved me time on days that I couldn't spend in the kitchen. Check it out and let me know what you have created in your kitchen!


I know with Winter just a skip hop around the corner and a lot of you guys will be craving soup! I know I will! Nothing beats a good bowl of soup to warm your insides when it is freezing cold outside! Okay... I know Vegas doesn't get that cold, but being a Floridian most of my life, I sure do get cold easily!

I have fallen in love with kabocha squassh! It's currently my favorite type of squash. I am sorry spaghetti squash. You were my favorite, but I have moved on to something sweeter! Don't worry... our relationship will truly never end because I need you as my pasta!

Roasted is my favorite way to eat kabocha squash. Lately, I have been roasting ahead of time and then freezing it for later uses. Make sure the squash is cooled completely before freezing. Also, I like to measure out 1 1/2 cup portions (3 Greens) and stick them in freezer Ziploc bags. That way it's easy to pull out what I need . When I need the squash, I defrost it in the fridge overnight. For instructions on how to roast kabocha, check out my recipe for Baked Kabocha.

When you have your kabocha squash prepared, the soup is a cinch to make! Just combine the ingredients, simmer for about 10 minutes and blend. It doesn't get any easier than that! This would definitely be a great weeknight lunch or dinner. Just serve with your favorite Lean. You could also prepare the soup and then freeze it in freezable containers.

Feel free to adjust the spices to your taste! There are so many types of variations. I chose to do a basic soup with onion powder, garlic powder and parsley. Gosh, I am boring! The natural sweetness of the squash blended with savory spices makes this soup delicious! You could also try garlic powder, curry powder and garam masala for more of an Indian flavor. Or how about ground ginger, ground cinnamon and a dash of nutmeg to enhance the sweetness of the squash. Maybe even some cardamom or roasted sage? The possibilities are endless if you have a great soup base.

Kabocha squash is an excellent substitute for butternut or pumpkin squash with lower carbs and calories than the other two. It's perfect for a chilly day! Give it a try! Enjoy this yummy soup!


Roasted Kabocha Squash Soup

Ingredients:
3 cups roasted kabocha squash (6 Greens)
2 cups chicken broth (2 Condiments)
1 1/2 cups unsweetened cashew milk (1 1/2 Condiments)
1/2 tsp garlic powder (1 Condiment)
1/4 tsp onion powder (1/2 Condiment)
1/2 tsp dried parsley (1/6 Condiment)
1/8 tsp black pepper (1/4 Condiment)

Directions:
In a medium saucepan, combine all ingredients over medium high heat.
Bring the mixture to a boil and then let simmer for 10 to 15 minutes.
This simmering will get the flavors blended. Let cool slightly.

Add mixture to a blender and blend until smooth.
Evenly distribute the mixture into two bowls.

2 servings with 3 Greens and 3 Condiments per serving

Serve this soup with your favorite Lean! I love to eat this with two Trader Joes garlic and herb chicken sausages or two Al Fresco Andouille Chicken Sausages. No healthy fats needed! I slice up the links and heat them in a skillet until they are nice and brown. Then I throw them into the soup. Another option I like is shrimp because shrimp absorbs the flavor of everything! If you choose shrimp, don't forget to add two healthy fats!

Click Here to Print

I am fairly new to kabocha squash but man oh man... where has it been all my life? I have absolutely fallen in love with it! It tastes quite similar to butternut squash, pumpkin and sweet potatoes but with less carbs!


Kabocha squash is an Asian winter squash commonly known as Japanese pumpkins. It is slightly sweeter than butternut squash, but it has a less calories and carbs. One cup is only 40 calories and 7 grams of carbs! A great veggie for the low carb lovers or those trying to watch their waistline! Not to mention it has lots of beta carotene, iron and vitamins! The taste and texture is a combination of  both pumpkin and sweet potato. Pretty awesome marriage of flavors going on! That is why this squash makes a wonderful substitute for "pumpkin" pie and it works so well for the recipe below.


But wait... where do I find this yummy tasting veggie? I had no problems finding it at my local Trader Joes. They had tons for $2.29 each! I have also heard that they can also be found at local Asian markets (sometimes year round) and local farmers markets. Again, I am fairly new to this squash so I haven't really been searching a long time for it and I am lucky to have a Trader Joes by me.

They are usually available in late Summer to early Fall and can be stored in a cool dry place up to one month. You can extend the life of the squash by freezing it. Check out this site for Ways to Freeze Winter Squash. Try to use plain frozen kabocha squash within 3 months.


The outer layer of kabocha squash can be really tough to cut through. Microwave the squash for about a minute or two to soften it up some. Use a large sharp knife to cut the squash in half. You are really going to have to work at it to get that sucker open. It may help to cut the stem off at the top and then slice through the squash. 


Scoop out all the seeds and guts with a spoon. Guts just sound so appropriate with Halloween coming up, doesn't it?  :) 


Cut the squash into wedges. You can leave it as wedges, but I took it a step further and cut the wedges in half. Also, you can cut or peel the skin off before baking, but I chose to do it after baking since it was easier. Place the pieces on a baking sheet lined with non-stick foil. Spray non-stick cooking spray on the squash. I used coconut non-stick cooking spray, but whatever kind will do. Roast the squash for about 30 minutes and then flip the squash over and roast for another 15 minutes or until softened. Let cool.


Once cooled, cut or peel the skin away from the wedges and put the squash in a bowl. Measure out 2 cups for this recipe and store the rest. Add the 2 cups of squash to a blender. Then add all the other ingredients except the walnuts because those are for the topping.


Some people have asked me my sweetened of choice. I love these little packets of stevia that I get from Amazon. There is no bitter aftertaste! We can all appreciate that!


Once you have all your ingredients in the blender, blend until it is nice and smooth. If you need to add a little bit more unsweetened almond or cashew milk, please do so. I found 1/4 cup to be enough but some may like their pies to be a little less dense.


Spray four ramekins with non-stick cooking spray. Evenly distribute the mixture into the ramekins. Bake at 425 degrees for 15 minutes.


Reduce the temperature to 350 degrees. Remove the pies from the oven and add the walnuts. This is only an option of course. Seven walnut halves count as one optional snack, but I will tell you this... don't skimp on the nuts! The walnuts get toasted right on the pies and their natural flavors are enhanced. It takes the place of a traditional pie crust, except it is on top of course, and you really just won't miss it. Not to mention walnuts are the only nut with a significant source of plant-based, heart healthy omega-3 fats. If you like, make one or two pies with the nuts and leave the nuts off on the others.


Let the pies cool and add a little bit of fat free reddi whip and a sprinkle of ground cinnamon, if desired.


A heavenly dessert just in time for the holidays! Trust me when I say your house will smell like Fall when baking these desserts! Who needs pumpkin pie when I have this healthier version? I know I don't! Enjoy!


Baked Kabocha or 
Crustless "Pumpkin" Pie

Ingredients:
2 cups roasted kabocha squash (4 Greens)
1/4 cup unsweetened cashew or almond milk (1/4 Condiment)
2 egg whites
1/2 tsp ground cinnamon (1 Condiment)
1/2 tsp pumpkin pie spice (1 Condiment)
1/2 tsp maple or vanilla extract (1/2 Condiment)
1 packet NuStevia (1 Condiment)
28 Walnut halves (4 Snacks)

Directions:
Prepare kabocha:
Preheat oven to 400 degrees. Line a baking pan with non-stick foil. If the skin is too tough to cut, place kabocha in the microwave for 1 to 2 minutes. Cut the squash in half.

Spoon out all the seeds. You can cut or peel the skin off before baking, but I found it easier to peel after baking. Do whatever you prefer. Cut the squash into wedges. Lay the wedges on the prepared pan. Spray the wedges with non-stick cooking spray. Bake for 30 minutes. Flip the squash over. Spray with cooking spray. Bake for 10 to 15 minutes or until it is cooked.
Let cool. 

Once cooled, peel or cut off the skin with a knife. Normally I eat the skin when roasting but for this particular recipe, I like to remove the skin for a smoother richer taste.

Measure out 2 cups of cooked squash, without the skin. Use the rest of the squash for another time.

To make pies:


Preheat oven to 425 degrees. Spray 4 ramekins with non-stick cooking spray.  Add 2 cups of squash, without the skin, and the rest of the ingredients, except walnuts to the blender. Blend until smooth. Pour mixture into ramekins. Bake for 15 minutes. 

Reduce heat to 350 degrees. Remove ramekins from oven and evenly distribute the walnuts on top of each ramekin. Bake for an additional 25 minutes.

Makes 4 Servings
Each Serving provides
1 Green, 1 Condiment and 1 Optional Snack


With the football season, I know that it can be difficult to find delicious appetizers that will appeal to everyone! But trust me... there ARE healthier food options out there that actually taste good! I mean... yeah... I still love buffalo hot wings, a yummy bowl of chili with all the fixings, burgers, sub sandwiches, chips, etc, but I have found some pretty tasty alternatives to my favorite party foods. This is one of them! I love spicy jalapenos mixed with ooey gooey cheese and the creamy goodness of Greek yogurt and cream cheese. Adding chicken packs this dip with extra protein and makes it more filling so you can have it as a complete meal with veggies!


What makes this dish even better is that you can prep your chicken ahead of time. Prepping your chicken ahead of time makes this dish so easy to put together right before game time! No one wants to be stuck in the kitchen during game time! Come on! You can always buy a rotisseries chicken from the grocery store. Remove the skin and bones and shred it up.


If you want to prepare your own chicken, my favorite way to cook chicken breasts is in the slow cooker. The slow cooker always gets the chicken breasts really moist as long as you do not over cook it. This is how I make my shredded chicken breasts:

Quick and Easy Crock Pot Shredded Chicken

Ingredients:
3 pounds of chicken breasts or tenderloins (6 Leaner)
1 cup chicken broth (1 Condiment)
Seasonings of choice ~ subtract from your Condiments
(I like salt, pepper, garlic powder and onion powder)

Directions:
Season the defrosted chicken and then place them in the slow cooker.
Pour chicken broth over the chicken.
Cook 6 to 8 hours on LOW or 3 to 4 hours on High.
Drain the chicken and shred the chicken with two forks. 
All done! Now you have enough chicken for a few meals!

Makes 6 Servings
Each serving provides
1 Leaner (Condiments will vary)


Weigh out 6 ounces of chicken and then place the portions into Ziploc baggies. Usually I put a few bags in the fridge and the rest in the freezer for later. These little baggies are great when I am craving chicken or need them for a recipe.


This recipe calls for 12 ounces of cooked chicken so I used my awesome scale to do all the measuring for me. Not to mention if you try to eyeball how much chicken you think you should have, it may not be accurate. You may be cheating yourself of some much needed protein or you may be eating too much.


Now that your chicken is measured out, you can add all the other ingredients except half the cheese which is for the topping. Give it a good stir because you wouldn't want any pieces to feel left out!


Pour the mixture into a baking dish. Spread it out evenly. Then top with the remaining cheese. Bake for about 20 minutes or until cheese is melted.


The entire dish makes 4 servings. I took out my portion and put it in my own personal ramekin and served it with sweet mini peppers. Those darn veggies are addictive! This dip would also make a delicious wrap because they have a thick consistency like chicken salad. Enjoy!


Jalapeno Popper Chicken Dip

Ingredients:
12 ounces cooked shredded chicken breasts or use the breast meat from a rotisserie chicken from the grocery store (2 Leaner)
3/4 cup Fage low fat plain Greek yogurt (1/2 Leaner)
4 ounces reduced fat cream cheese (4 Healthy Fats)
6 slices turkey bacon cooked and crumbled (1/2 Lean)
3 ounces canned jalapenos, diced (3 Optional Snacks)
1/2 tsp garlic powder (1 Condiment)
1/2 tsp onion powder (1 Condiment)
1/4 cup grated fresh Parmesan cheese (4 Condiments)
1 cup shredded reduced fat sharp cheddar cheese, divided (1 Lean)

Directions:
Preheat oven to 375 degrees.
Combine shredded chicken, yogurt and cream cheese in a medium sized bowl.
Add crumbled turkey bacon, diced jalapenos, garlic powder, onion powder, parmesan cheese and 1/2 cup cheddar cheese.
Stir until combined. Pour mixture into a baking dish.
Top with remaining 1/2 cup shredded cheese.
Bake for 20 minutes or until cheese has melted.

Makes 4 Servings
Each serving provides 
1 Leaner, 1 1/2 Condiments, 1 Healthy Fat and 3/4 Optional Snack


Powered by Blogger.